Pages - Menu

Showing posts with label ambrotype case. Show all posts

Monday, January 23, 2012

Cases, Burnishing, Colorization Oh My!

     After recovering from last week I am back up and running. This weekend my father and I went to my favorite glass shop in all the world  Stained Glass Supplies in Eagle Rock. The nicest people and the coolest products! Love the guy there who cuts the glass. He is super friendly and always helps his customers. My dad was in love with all the crazy glass and I was able to pick up four sheet of glass I can not wait to use... more on that later.
    Before I left Pasadena I was able to pick up some supplies at Blick. I purchased some colored pastels and book binding paper. After Blick I headed out to Los Nietos to visit my grandparents home. I was able to get two plates done of some of his tools. On Friday after my grandmother's services I will be photographing my crazy family. It was nice to see my aunts and my uncles. I do not get to see them all that often, but they look the same to me! Every year we have a family reunion and I remember being little and timid in front of them because they were so loud and always hugging and kissing the kids. Now I have learned how lucky I am to have that kind of a family.


Work table. Have everything planned out and experimenting.


The leather book binding paper I purchased at Blick.


Frustrated. I hated the super bright red paper. 
                                          
         You can see the marks from the cotton on the plate. I suppose I pressed to hard. I am still trying to figure out this burnishing, but to me it makes a huge difference and worth sacrificing some plates. My grandfather was a carpenter and here is one of his many screw drivers.


     Here is an example of one of my grandpa's scissors. You can see the over rubbing again from this angle, in addition you may be able to see some of the gold pastel on the blades. I am not to happy with how the plates come out, but practice makes perfect.


Looks like petrified wood to me!


Love the greens! I know these would be perfect with a gold trim.


These glass pieces are complete perfection! I can not wait to use these as mattes in my ambrotype cases. I have seen some vintage daguerreotype frames who utilized a concept similar. So I am spinning my own ideas for cases and frames and can not wait to finish these bad boys! Super excited!


Friday, January 20, 2012

The Box and my Booth at the Folk Tree Jan. 21st-22nd

     Things are finally coming together! I know this is certainly a learning stage and will be making these boxes for many years to come. So here is my first almost completed box. It needs the glass and the plate needs to be varnished, but other than that I did it! I know it is not history correct, but I like this open shadow box effect and I can hang it on a wall.
    Also, John and I went this morning to an estate sale. Found some awesome vintage goodies including an original never used 1940s "Exposure Meter" and two sets of 1948 Pin Up playing cards never opened. A very successful morning of treasure hunting. I also got these two wood inserts for $1.00


Before Shots of the Wood


  Painted the smaller frame with a Montana Chrome spray paint. Still needs two more coats.


I made the outer wood frame this morning and here is the oval frame painted with the Montana brand spray paint in Copper. I plan to use this case to frame my first 8x10 ambrotype.


    Back to the smaller case I first made. You can see the red is much brighter. This is before I added the black velvet piece inside to hide the messy paper fold.


Here it is! My first case! The plate needs to be varnished and I need to put clear glass inside to protect it. But otherwise a long a tedious experience. I know the rest of the cases will go much smoother!

Also make sure you check out the FOLK TREE in Pasadena tomorrow from 2-6pm I will have a booth and be showing my work and explaining the process. Due to weather the portraits will be taken next week. Thank you and see you there: 217 S. Fair Oaks Pasadena 626.795.8733


Thursday, January 19, 2012

Never Ending

     This week has been full of bad fortune and loss. My grandmother passed away early this morning and my dog Whiskey now only has one eye. Through all that I am still working on these ambrotype cases. I have been to Harbor Freight about four times since Tuesday and Sears four times since yesterday on the hunt for the perfect saw. I have gone through three saws. One table saw from Harbor Freight, a Craftsmen fixed miter saw from Sears, and finally my Craftsmen compound sliding miter saw. Long story short I had to convince the guy at Sears to sell me the display and I have to go back and re-purchase the table saw from Harbor Freight sometime this weekend. Oh did I mention the weather man says it is going to RAIN THIS WEEKEND!? This weekend I am scheduled at the Folk Tree! UH.....


Here are some pictures with accompanying helpful hints.


Here is the saw that solved all the problems. The pre-cut Hobby wood I get from Lowe's is 6"inches in diameter and the stationary miter saw would not reach through the wood. I love this saw and would say it is awesome. Doing angled cuts on this bad boy is a bit scary, but perfectly fine. The laser also is actually accurate unlike the stationary saw from Craftsmen.


After cutting the wood here are my first two practice boxes.


Here is one of the boxes from Michael's. I am practicing wrapping it with paper. Using a super thin material like paper is way easier to wrap a box. It comes out much cleaner and fits together much nicer. There is one paper which I wrapped my box in I got from Michael's for $1.99 and it is between a paper and fabric. It does not tear easily and has a fabric velvet feel to it.


After I wrapped the box. I went to wrap the second side and realized it was lopsided.


Constructing and gluing together one of my cases/shadowbox.


Gorilla wood glue, but it takes forever to dry.


This spray paint from Blick for around $8.00 has made a huge difference to my wood trim. This paint really makes the wood look like a decorative metal foil. I am so thankful I found this stuff! I also bought a chrome/silver to use when I layer the frames.


In person it looks like metal! I did two more coats after this one to really make it shine.


The shadow box was really deep and I wanted to lift it just a bit so I added another sheet of wood inside.


In the gap I plan to drop in another wood frame to go on the outside of the gold metal one. I need the Harbor Fright table saw to cut the small pieces at a 45 degree angle.


The box is glued and ready to go!


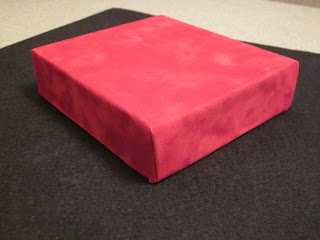
I lightly sanded the box and then I wrapped it in paper. 


The true color of this is the red curtain you see at the movie theatres. Still working on this folding business, but I have imrpoved greatly.


Feels like a velvet and is bright bright red. In the store it looked more muted in the store.