Pages - Menu

Showing posts with label price list. Show all posts

Wednesday, January 25, 2012

Holga Meet Collodion

     Had this idea for a long time and today I finally got to do it! After installing a blower motor this morning in Diamond Bar John dropped me off for my official hobby day! Hobby days are those fully dedicated to wet plate collodion or any other fun activity. Tomorrow John shall participate in the festivities with his 66 impala project. Anyways, today I took my Holga Stereo camera off the shelf and was able to successfully shoot 5 plates. The plates are not the best, but the camera is fully functional. I believe I worked out all the kinks and should be ready to produce plates tomorrow. The rest of the week is pretty much dedicated to collodion because tomorrow I will be shooting my Holga camera all day, Friday I will be at my grandma's house after the funeral shooting all my relatives, and then Saturday and Sunday I will be at the Folk Tree.
 
For those who want to beef up their Holga and adapt it to collodion here is how:


I am using 1/16th of an inch clear glass. I know the tin I use is super thin and would also work in the Holga.


I am using John's dremel at speed 2 to eat away at these annoying notches. With these notches gone I can easily close the camera.


Notice the tip on the dremel. This tip totally ate through the plastic super easy.


Not the neatest job. Yes, I was in a hurry because I was so excited.


Here are the plates I cut myself with the new strip cutter I got from Stained Glass Supply in Eagle Rock. The plate size is 5.25x2.5 inches.


Work area. The strip cutter is on the left and super handy! Makes my work flow much faster.


Cleaning plates and there is my handy dandy timer. I purchased this timer from Big Lots about 8 months ago and it is still going strong.


I keep my chemicals in an ice chest, which is then stored in my dark box. The ice chest does absorb most of the smell, but if I leave my dark box in my car for to long the whole care is consumed in collodion stench... at least that is what my father tells me, (I can not smell it anymore).


My dark box. Next month my dad and I are going to build a new one. This was the prototype and was created in a hurry. I had about a week to construct one before Ken Merfeld's class began last year.


The first plate!  A complete success! Not the best image, but hey it worked!


Here is the inside of the camera. The plate sits on the natural border of the Holga. Each plate is easily put into the camera and slowly taken out. Since the camera is made of plastic there are no silver stains, or annoying stickiness.


The back of the camera.


     I assumed the red film provided by Holga would be strong enough to block leaking from the outside of the camera. I was very wrong! On my first couple of plates You can see the window allowed for light leaks. Make sure to cover that up with tape.


You can see it clearly in this image the fogged circle. Also you can see the Holga has some sharpness to it. The fountain in my backyard looks even more menacing. You will also notice a big collodion streak on the plate. The collodion was not sticking to the plate and the film was coming off. To keep the image stable I took it out of the fix so it could hurry and dry so I could get a picture.


One of the plates of my fence. I apologize for the artifacts on the plate. My silver bath needs filtering.


Close up of the vine on my fence.


Another close-up. Again these are test images and I can not wait to experiment with it more. I hope to create some short of chart indicating how I can get each image to be sharp and perfect exposures.

Friday, January 20, 2012

The Box and my Booth at the Folk Tree Jan. 21st-22nd

     Things are finally coming together! I know this is certainly a learning stage and will be making these boxes for many years to come. So here is my first almost completed box. It needs the glass and the plate needs to be varnished, but other than that I did it! I know it is not history correct, but I like this open shadow box effect and I can hang it on a wall.
    Also, John and I went this morning to an estate sale. Found some awesome vintage goodies including an original never used 1940s "Exposure Meter" and two sets of 1948 Pin Up playing cards never opened. A very successful morning of treasure hunting. I also got these two wood inserts for $1.00


Before Shots of the Wood


  Painted the smaller frame with a Montana Chrome spray paint. Still needs two more coats.


I made the outer wood frame this morning and here is the oval frame painted with the Montana brand spray paint in Copper. I plan to use this case to frame my first 8x10 ambrotype.


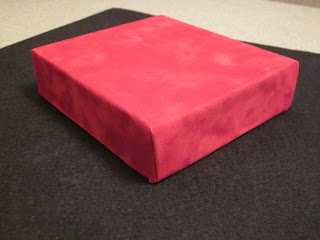
    Back to the smaller case I first made. You can see the red is much brighter. This is before I added the black velvet piece inside to hide the messy paper fold.


Here it is! My first case! The plate needs to be varnished and I need to put clear glass inside to protect it. But otherwise a long a tedious experience. I know the rest of the cases will go much smoother!

Also make sure you check out the FOLK TREE in Pasadena tomorrow from 2-6pm I will have a booth and be showing my work and explaining the process. Due to weather the portraits will be taken next week. Thank you and see you there: 217 S. Fair Oaks Pasadena 626.795.8733


Thursday, January 19, 2012

Never Ending

     This week has been full of bad fortune and loss. My grandmother passed away early this morning and my dog Whiskey now only has one eye. Through all that I am still working on these ambrotype cases. I have been to Harbor Freight about four times since Tuesday and Sears four times since yesterday on the hunt for the perfect saw. I have gone through three saws. One table saw from Harbor Freight, a Craftsmen fixed miter saw from Sears, and finally my Craftsmen compound sliding miter saw. Long story short I had to convince the guy at Sears to sell me the display and I have to go back and re-purchase the table saw from Harbor Freight sometime this weekend. Oh did I mention the weather man says it is going to RAIN THIS WEEKEND!? This weekend I am scheduled at the Folk Tree! UH.....


Here are some pictures with accompanying helpful hints.


Here is the saw that solved all the problems. The pre-cut Hobby wood I get from Lowe's is 6"inches in diameter and the stationary miter saw would not reach through the wood. I love this saw and would say it is awesome. Doing angled cuts on this bad boy is a bit scary, but perfectly fine. The laser also is actually accurate unlike the stationary saw from Craftsmen.


After cutting the wood here are my first two practice boxes.


Here is one of the boxes from Michael's. I am practicing wrapping it with paper. Using a super thin material like paper is way easier to wrap a box. It comes out much cleaner and fits together much nicer. There is one paper which I wrapped my box in I got from Michael's for $1.99 and it is between a paper and fabric. It does not tear easily and has a fabric velvet feel to it.


After I wrapped the box. I went to wrap the second side and realized it was lopsided.


Constructing and gluing together one of my cases/shadowbox.


Gorilla wood glue, but it takes forever to dry.


This spray paint from Blick for around $8.00 has made a huge difference to my wood trim. This paint really makes the wood look like a decorative metal foil. I am so thankful I found this stuff! I also bought a chrome/silver to use when I layer the frames.


In person it looks like metal! I did two more coats after this one to really make it shine.


The shadow box was really deep and I wanted to lift it just a bit so I added another sheet of wood inside.


In the gap I plan to drop in another wood frame to go on the outside of the gold metal one. I need the Harbor Fright table saw to cut the small pieces at a 45 degree angle.


The box is glued and ready to go!


I lightly sanded the box and then I wrapped it in paper. 


The true color of this is the red curtain you see at the movie theatres. Still working on this folding business, but I have imrpoved greatly.


Feels like a velvet and is bright bright red. In the store it looked more muted in the store.

Thursday, January 12, 2012

Extended Dunker

     Here she is extended and ready to go! Cost me a whopping $4.61. So the silver is on its way and the process shall begin all over again. I also noticed that my husband's dremel can cut through 1/8th inch acrylic. I did not realize it and assumed that it would crack the acrylic. Well to my surprise it cut like butter! Another alternative would have been to buy a remnant 1/8th acrylic sheet and have him cut me out another dunker. But since I already had this original dunker when I bought my first silver tank I decided to just go with it. 
     I plan to make more tanks for my new dark box and this first prototype was a very good success! No leaks and affordable for me. If I were to change anything I would probably make the tank out of red acrylic and add a lid as well. I do not know if I were to leave a plate in my silver bath, in my current dark box, if it would become fogged. I have two openings for my hands in the box and when my hands are submerged it is light tight.... I bet if I were to just roll up the openings in the box it should be ok. Another thing to think about... now off to shoot some flowers!


Here is the 4.5" extension piece.


Connected and waiting for the support piece.


I had an extra piece of acrylic so to add more support we glued it on top of the extension piece and it overlapped onto the connect pieces to add stability.


Drying in the sun and waiting to be used.

Silver Tank Cont.

     Just ordered the extra silver from Artcraft Chemicals and I am ready for next weeks VINTAGE VALENTINE portraits at the Folk Tree. Before I processed my payment I measured how much water my tank can hold. I added a piece of 7.5x9.5 glass along with the plate "dunker". I do not know the official word used for the spatula shaped acrylic holder that allows you to pull the plate out and in to the bath.


      Anways, since both of those have weight it means less silver and less distilled water needed. In the end I calculated my tank to hold 1200mL of water. This much water will cover the plate perfectly without spilling. In addition, my dunker was from my original smaller tank. Since S & W Plastics would charge me and arm and a leg to make another one I have come up with a simple solution.


        Here is what I mean by my plate dunker. It is to short for my new silver tank and I have to go back to S&W tomorrow to have a 1.5x4.5 inch piece of 1/8th acrylic cut to add more length. It should cost me under $8.00. A new whole plate silver bath tank costs over $100, not including shipping. So far I am in under $20.00.

Tuesday, January 3, 2012

Searching for a Carpenter and Price Breakdown

     So the search for a carpenter began today to make a lens board. Honestly I may just ask my dad to do it, but I do not know if he has a drill bit big enough to make a 3.5 inch hole into the board. Anyways I am going back to old faithful... craiglist. I know people may be critical toward the site, but I have literally found all of my favorite things on this site! From 1950s sofas, Victorian stair rail, and my 8x10 wet plate camera. I have written a few people for estimates and we shall see how that goes. Here is a copy of the images I included for the estimate.


     In addition, I have begun to take into consideration how much money I have put into wet plate over the last month.... boy does it add up. The camera, tripod, lens, three 8x10 holders, and two lens boards was $575.00. The acrylic for the new silver tank was $28.00. The new brass lens was $38.00. The custom aluminum lens board attachment was $53.00, personally I believe I was ripped off on that one. I am awaiting the final total for the wooden lens board. All in all I am in a total of $694.00 to shoot an 8x10 plate for my 24th birthday. Talk about an expensive experience. Lets hope I can keep the carpenters price under control. Also, this does not include the price of producing a plate with the collodion and silver. By my calculations on plate should cost me, (and this is including every single thing from distilled water to hypo to the varnish), at around $20.80. Now this is a pretty high estimate because I assume in all my calculations shipping, tax, and time. I have done breakdowns for my 4x5 plates and done the calculations for that as well. For me an 8x10 plate would use $2.40 worth of collodion, a whopping $8.40 of silver, $2.00 of varnish, .80 cents of sodium thiosulfate and the glass is $4.64. I know everyone uses different wholesalers to buy their supplies and I personally use Bostick & Sullivan, which I love! I do have to pay for a shipping from New Mexico to Riverside and pay more obviously because they mix everything for me. I do plan to begin to mix my own materials. I do hope that would lower the price of producing a plate. Also, the since I am using glass at $4.64 that price will be lowered because each plate is not a keeper and that will also take into consideration if I use $2.00 worth of varnish. Again, 8x10 plates I think would be for me personally and for something serious. My Sinar P is my everyday rough and rugged camera. Fortunately the smaller plates are not to harmful to my pocket. I am also considering transforming my Pentax 6x7 camera into a wet plate collodion camera via a Polaroid back.